Pages

Monday, March 25, 2013

Cake Bake

Hey all!! I thought we'd talk about a different kind of DIY this week: Baking!!! But how can you bake in your tiny dorm room, you ask? Here are two different recipes I stumbled across. They are tested and college kid approved!

Recipe 1: Soda Cake

What you'll need:
- 1 box of cake mix
- 1 can (12oz) of DIET soda
- a pan and an oven

Photo Credit: http://www.pelkeyfamilyof4.blogspot.com/  


My boyfriend's aunt gave me this recipe, and it was quite the hit with my friends! After all, what college student cant get their hands on some soda? Have your parents add a box of cake mix in their next care package, and you're all set.

There are two different "recipes" for this. Whatever you decide to do or experiment with, remember to use diet soda. We did a devils food cake mix and diet coke, but I've also read that if you want to do a lighter cake you can use diet sprite or 7-up.

All you have to do is mix the soda and the cake mix, and then pour it into a pan. My mom had brought up cupcakes for my birthday, so I had a disposable pan left over. Heat the oven and bake according to the directions on the back, watching it closely as the time approaches (ours was done a few minutes early, but each oven is different).


As you can see, we certainly enjoyed it!! Grab some frosting and enjoy!

Recipe 2: Microwave cakes

What you'll need:
- 1 box angel food cake (required!!)
- 1 box of whatever cake mix you'd like
- water
- tablespoon measure (or a plastic teaspoon: 3 teaspoons equals 1 tablespoon) 
- a microwavable mug


What if you don't have an oven handy, or really just want enough dessert for one? This is definitely the recipe for you!! Plus, its even easier than all the other mug brownie recipes because it has so few ingredients.

The angel food cake is required, but the other cake is completely your choice. I used German Chocolate Cake (a family favorite). It's yummy, but next time I would pick a more intensely flavored variety, like devils food.


Put the 2 mixes in a bag and mix them well to combine. Then add 3 tablespoons of mix and 2 tablespoons of water in a mug. Mix this well, getting rid of all the clumps (it may be kinda foamy, that's fine). Microwave on high for 1 minute, and you've got yourself dessert! 


I know we all love the dining hall food, but nothing beats the satisfaction of baking something yourself, even if it is just in the microwave. Treat yourself to sweet study break, and happy (food) crafting!!

Thursday, February 28, 2013

Photo Flower


Sorry it's been so long since my last post. Gotta love midterms, right? Well in the mix of all my studying and paper-writing, I decided to take a crafting break. This one is so easy to do, and it's such a cute way to bring an early spring to your room. Plus, it helps clean out your crafting bin from all those left over pieces.


What you'll need:
-Sturdy wire (mine is beading wire)
-Wire cutters
-Yarn (as many colors as you want to use- I used 2)
-tape
-Magazine pot (See? I said that this post would show up again)
-Clay or poster putty
-glass rocks to fill the pot (left over from this craft)

 
The first part of this craft is to shape your flower out of wire. Make one petal at a time, wrapping the wire around the center post so each is secure. This also creates the center for your flower (think daises). Then make stem, folding the wire so it goes up and down the length 3 times for added stability.

Now decide what pattern you want to create with your yarn. I only had access to pink and purple, but it definitely matches my dorm this way. Pick a peddle to start on (it doesn't really matter which one) and tie the yard firmly to the wire. Next tape the short tail from the knot to one of the unwrapped petals. This is temporary, but it needs to be held down while you start wrapping. Wrap the yarn tightly around the wire, continuing around the petal as you go.


If you want to make more than one petal the same color, don't worry about using a separate piece of yarn for each one. It is actually easier to pass behind the center of your flower (by doing this you are essentially picking the front and the back of the piece) and continue wrapping on the other petals. Once you are done with that color, tie the end that you are holding to the end that you taped down in the beginning. If the knot is tight enough, this will keep the whole thing from unraveling. Follow the same steps for as many colors as you want to do, tying it all together in the back when you are done.


To finish it off, grab one of the cute bowls/pots you made from magazines in the earlier post (or find a different vessel) and put a glob of clay at the bottom. I actually used that poster putty that you use so you don't damage dorm walls, and that works just as well. Stick the stem of your flower into the clay and mold it around the wire so it stands up straight. Finally add the glass rocks to the pot to fill it (apparently I didn't bring as many as  I thought, so I'll have to finish filling mine over spring break).


All that's left now is to find your favorite photos and stick them between the petals of the flower. Cute, right?! Unlike a normal "frame" this is both whimsy and easy to change out. You could add a different photo every day if you really wanted to. Enjoy your new decor, and, as usual, happy crafting.

Thursday, February 14, 2013

Non-accidental Bleaching


For those of us in the northeast, this last weekend was quite the blizzard, which meant a lot of time stuck inside. My friends and I kept busy, however. What better a way to pass the time than crafting? This week's adventure was bleaching a t-shirt. Everyone at some point or another has opened the washing machine and realized that they accidentally got bleach on their favorite outfit (Bummer!). We decided to try our hand at "ruining" a shirt on purpose instead, and it came out pretty great!


What you'll need:
- A t-shirt
- cardstock
- scissors 
- cardboard
- a spray bottle
- liquid bleach
- a place to rinse the shirt out

The first step: pick your victim. I got my shirt at Goodwill, but Michael's has a great selection too. Or, better yet, raid your closet for a t-shirt you never wear and turn it into a handmade outfit. One note about picking your t-shirt: consider colors. The darker the shirt, the better, and remember that black when bleached turns a weird rust-yellow color. This could look really cool, but if you're expecting grey, you'll be disappointed.


Next, pick your design. Keep in mind that you are going to use the outline of whatever design you choose as a stencil for your shirt. You could draw something yourself, or do what I did and find something off the internet. Can you guess what I chose? Yep, yet another Harry Potter reference: the deathly hallows symbol. (I also referenced my addiction to HP in my first blog post) I liked this one because it was easy to cut out and represented my inner geek. Draw/print your design on cardstock and cut it out.

Next, mix the bleach solution. I used 1 part bleach to 3 parts water. I know it sounds really watered down, but it works just fine. Pour it into a spray bottle and you're ready to go.


Put a piece of cardboard in between your shirt (where your body would go). This keeps the bleach from seeping through to the back. I forgot to cover the neck hole of my shirt, so it is slightly bleached on the inside too, but luckily it didn't get through to the back. I also spread some wax paper down (newspaper would work too) so that the spray didn't accidentally get on the table. Lay your stencil where you want it on the shirt and press it down firmly. I know it seems like you need something to stick it to the shirt, but you really don't. It works like a charm as is.

The next step is to spray the shirt. Make sure you are standing almost directly over it. This way none of it seeps under the stencil. Because we did ours on the table, we had to stand on a chair to spray it. Be sure to spray evenly, making sure the entire area you want to bleach is damp, but not soaked.


Now you have to stand there and watch it. You'll be able to see it start to change colors. (I removed the stencil so I could watch the contrast more closely.) It is kind of like playing chicken with yourself, because as soon as you like the way it looks you have to run the shirt to the sink and rinse it out. The longer you leave it, the greater the contrast. In retrospect, I probably would have left mine a little while longer, but I still like the way it turns out. If you chicken out too early, you can always dry the shirt and do it again. Just lay the stencil in the same spot and repeat the steps.


Once you've rinsed it out, hang it up to dry completely. I would recommend washing it separately from the rest of your clothes the first time, just in case there is any bleach residue hanging out in your awesome new outfit.


There you have it! People are definitely impressed that we did this ourselves, and it makes your average t-shirt so much more exciting for very little money. The possibilities are endless, so enjoy creating your own wardrobe. Happy crafting!! 

Thursday, February 7, 2013

Magazine upcycle


I have always had magazine subscriptions, and I typically end up saving each magazine because "they might be useful someday." Aka, they are the classic sign of a craft project in waiting. This has been the biggest deal all over the crafting websites, and I thought I'd give it a go.

What you'll need:
- An old magazine
- scotch tape
- scissors
- Protractor/ruler (optional: it just helps you get a cleaner fold)
- Mod Podge (yes, our old friend is back again!!)
- a paintbrush 


The first step is to cut the pages. Cut them as close to the seam as possible, and then cut in half longways. You'll end up with a pile of strips.


The most time consuming part is next: (1) Take the strip and put the most colorful side facing out from where you plan to fold. (2) Fold the strips in half and crease firmly. (3) Fold in half one more time, cleaning up the edges as much as you can as you go.

***HINTS: using the flat side of a protractor or a ruler really helps crease the paper and saves you from potential paper cuts. It also allows you to fold more than one strip at a time during step 2, which is a significant time saver*** 


This next part is my equivent to knitting (because I definitely cannot knit). Its easy and definitely something you can do while studying or watching TV.  Take your first strip and coil it onto itself. You want the coil to be as tight as possible without ripping the paper. When that strip runs out, put a clear piece of tape and overlap the next strip. Some designs say that pinching the corners as you go can create a square shaped bowl, and if you want to give that a try, start pinching from the beginning.


When rolling the coil, you have to decide how large you want your bowl to be, remembering that you need a decent sided base to support it. To test it at any given moment, just tape down the end of the last strip and slowly push the coil into a cone. BEWARE: if you push too far or too quickly, it will all uncoil and you'll end up with a long strip to start over with. I tested mine a lot in the process, partially because I'm impatient. When you like it, go ahead and leave it pushed out.


Here is the biggest argument my friends and I have had about these bowls. My next step is to tell you to cover the entire thing in Mod Podge so it is sturdy and wont come apart. My friends however like the idea of a collapsible dish(partially because it is fun to play with). It's really up to you and what you plan to store in it.


Ta-da!! You have officially made your very own recycled bowl. Because you decide the size and the shape, the possibilities are endless. One of mine ended up looking like a flower pot, so I have a feeling it will appear in future crafts... We'll have to see. Enjoy, and, as always, Happy Crafting!

Thursday, January 24, 2013

Winter Scarves Gone Crafty


I don't know about you all, but here you can't leave a building without a scarf. I could never have anticipated it being THIS cold! I love my scarves, both as a shield from the cold and as a stylish fashion accessory. I also hate how much room they seem to take up, especially in my tiny dorm room. Time for a crafty fix!!

What you'll need:
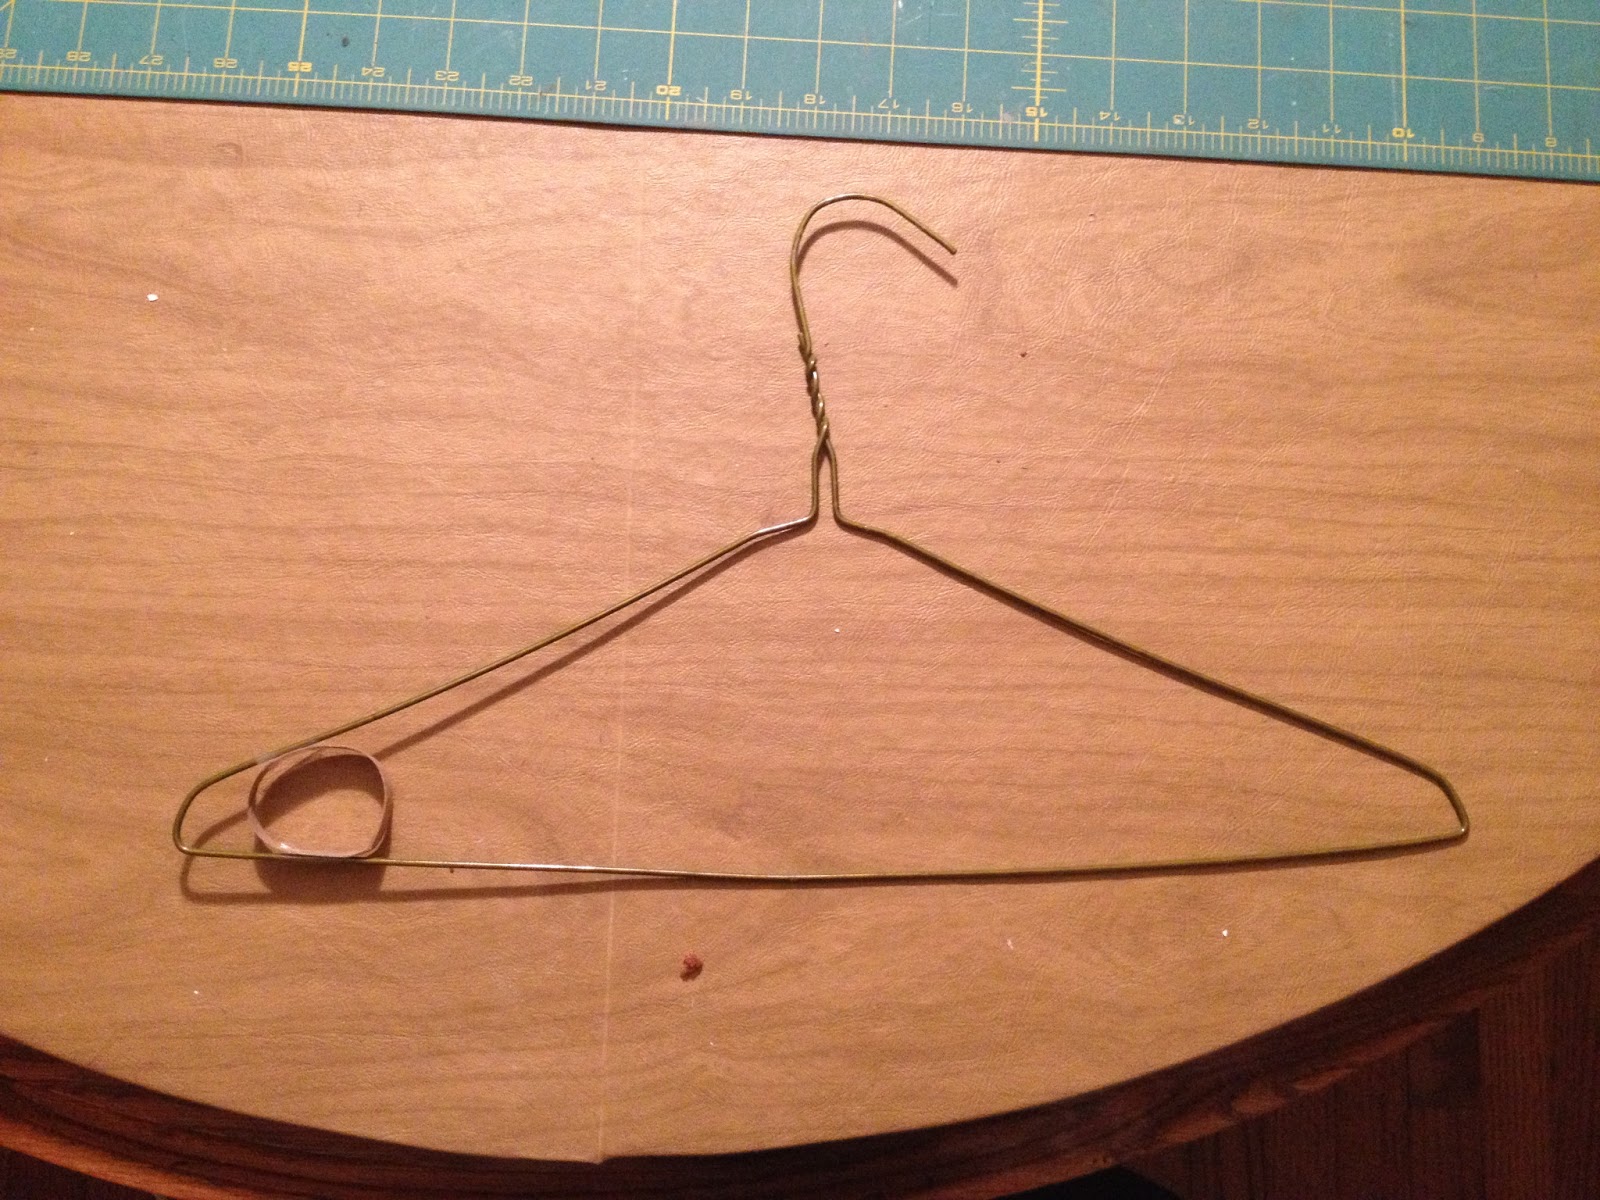
- a coat hanger (I stole a cheap metal one from my closet, but you can use any type you want)
- a few toilet paper tubes
- scissors
- a hot glue gun
- spray paint


Our house always has hangers like these laying around thanks to various trips to the dry-cleaners. I grabbed one and decided to put it to good use.


Grab a few empty toilet paper tubes and cut them up into disks. Mine were about an inch or so thick, but that doesn't really matter so much. Now, while your glue gun is heating up, start laying out where you want the tubes to go in the hanger. It's kind of a puzzle, and they are not going to fix perfectly, but the gaps could easily fit thinner scarves, so don't worry about mangling the tubes so they are tight together. Glue the rings to the hanger and to each other anywhere they touch. The more secure they are, the better.

This is what it should look like when its done. I decided that it needed a good coat of paint. Spray paint is the best to use because it coats evenly without soaking the cardboard and making it lose it strength. (NOTE: if your school doesn't allow spray paint, you can always use it as is and paint it on your next trip home) I used black because its pretty fool-proof, but you can choose any color you want.

***TIP: when spray painting anything, be aware of how the different colors are going to cover. Dark colors like blue and black cover very easily, but colors like white and pink are going to require careful painting and a lot of coats to get a finished look.*** 


And there you have it!! Now you have a simple and cheap way to hang up all your scarves and free up some drawer space around your room. Most of the scarves hanging in the photo above are made of different materials, so its safe to say this will work on pretty much any scarf. 


Good luck, stay warm, and as always, Happy crafting!!

Thursday, January 17, 2013

De-cluttering Cards


My mom was asking me to clean my room before I left for my second semester, but when I went to put left over books on my shelf, I found all of these instead; cards from every celebration over the last 2 years. Who knew they could take up so much space?! Of course I couldn't throw all these kind sentiments away (although I did weed through the ones that just had a signature), so instead I created a crafting opportunity.

Here's what you'll need:
-old sentimental cards
-composition notebook
-Mod Podge
-printer paper
-tissue paper (or construction paper)
- a button and string


I went into the craft closet and found several of these. They are cheap, but over the years my brother and I decided that they were our least favorite school supply. I liked the black binding, but the cover needed some work.


The first step is to cover the top with white computer paper. Cover the front in Mod Podge and then place the paper over it. Smooth it out as best you can, but it is going to be kinda bumpy, so don't worry too much about it.


Turn over the cover and use the same technique to seal the other side. Fold the paper and pull it taught. Paint more Mod Podge over the edges to make sure its secure.


The next part is the fun step: Decorating!! I love this combination of colors, but you could do any design or pattern. If you don't have tissue paper on hand, (TIP: I save it from all gifts to use later) construction paper will work as well, it just won't blend like mine did. I added a script title, but that's also your call.


After looking at my stack of cards, I realized that this book was going to get pretty bulky. Adding a tie, like a journal, seemed like a good way to keep it together. I grabbed a needle and stitched the button to the front, sealing the knot with hot glue. You could just hot glue the button on, but I felt like this was a little more secure. Then, just use the same method to attach a string to the back. It needs to be long enough to safely go around the button twice. (TIP: the end of my string started splitting the moment  I cut it. Just run the end of the string through Mod Podge, and it seals together without a problem.)

1

2

3

Then you get to put the cards in! I organized them by occasion (sweet 16, graduation, etc). The hardest part was deciding how to put them in. (1) Most of the cards I ripped down the seam and put on opposite sides of the page, but some (2) could fit on a single page, which saves some volume in the book. The third (3) option involves cards that can't be glued down the same way, often because they had writing on the entire inside. Gluing them down this way allowed them to still be opened, but it took up a lot more depth.


Tie it together and you're all set!! Now, like me, you'll have a way to hoard cards for years to come (sorry mom!). Let your cover represent you, and may the cards forever make you smile. As always, Happy Crafting!!

Monday, January 7, 2013

Coloring for Grown-ups


Who said crayons are only fun for kids? Here's a fun way to create "fridge worthy" pieces of art to decorate your dorm with.

What you'll need:
- A Cardboard box (or canvas)
- White Paint
- A Hot Glue gun
- Crayons (mine ended up needing two 24-count boxes, but it'll depend on your design)
- A Hair dryer


I ordered all my textbooks online over break, so when the boxes started to pile up, I decided that they would make the perfect backdrop for my latest crafting escapade. Instead of going out to buy poster board or canvas, I just painted one of the boxes white. Later I decided to cut the box in half, just so it didn't stick out so far from the wall, but that is completely your preference.


The next step is to line up the crayons in the order you want them. I decided to do a rainbow this time, but there are so many cool designs out there to choose from. Hot glue each one into place (mine hang off a little because its a small box, but we'll fix it later, don't worry). I reccomend a high-temp glue gun, just because it is sturdier and less likely to melt when the crayons do, but whatever you have will work fine.


Here comes the fun part. Tip your board up and find something to lean it against. You're gonna want to put something down underneath it so you don't get wax everywhere. Grab a hair dryer (isn't mine pretty!) and point it at the crayons. It takes a little time to get started, so if you're impatient like me, try to hang in there. It's worth it. Start by working on little sections, and then pick it up and move it around under the hot wind to get different patterns.

***Important tip!! If you are using cheap crayons like I did, they are going to start to sweat. I recommend grabbing a napkin and wiping down the wrappers of the crayons as it starts. This way the wax is thicker when it runs***


I wanted to add the words at the bottom, but realize that the wax basically has a mind of its own. I had to move the text over, but in the end I liked it better that way anyway.


One of the last things I decided to do was cut the tops off the crayons, right down to the top of the board I was using. I think it looks cleaner this way, but if you used a bigger board or like the way they look hanging off, by all means leave them. If you are in my situation and you want to trim them, however, now is the time. Grab a knife or a pair of scissors and slice right down to where you want them. The wax should still be pretty soft, so they are super easy to trim.


And there you have it!! Beautiful, inspirational artwork to hang around your room. The possibilities are endless, and it can be made to fit anyone's style. Dream on, and as always, happy crafting!!